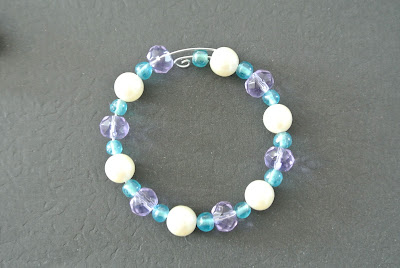
I have never been a napkin ring kind of person. I have always preferred to just eat as neatly as I can and use a paper towel (or my jeans) if that doesn't work out. But, in the process of planning a wedding, I just keep seeing beautiful table settings everywhere! We go to register, and the lady at the registry counter sets up little table settings to convince us to get pretty dishes. Then we talk to the event rentals company, and they show us their large selection of table linens. The more I look at table settings, the more I like napkin rings! There's just something about them that makes tables look so charming.
So, since I can't resist the opportunity to do crafts (especially if there are beads involved)... I decided to make napkin rings to use at our reception. They're really pretty simple to make.
Step 1: Gather your materials.
You'll need beads, round nose pliers, heavy-duty wire cutters, and memory wire. I used 1-3/4 inch bracelet size silver-plated steel memory wire that was 0.5mm thick, and the size/strength of the wire worked perfectly for what I was doing and with a variety of glass, crystal, and stone beads. If you wanted to use seed beads or pearls (with teeny-tiny holes), you might need a thinner wire- but then you lose rigidity in the finished napkin ring.
Step 2: Cut memory wire into individual loops.
Memory wire comes in a long coil like a slinky. Using the heavy-duty wire cutters, cut it into individual loops, with about an inch of overlap. You definitely want to use heavy-duty wire cutters for this, because memory wire is extra tough and will ruin ordinary pliers.
Step 3: Curl one end of the ring.
Use the round nose pliers to grab one end of the wire and curl it up into a little spiral.
Step 4: Add beads.
Decide which colors you want to use and try arranging them in a pattern on the table before you thread them onto your ring. I like doing ABAC patterns, like the one below. As you thread the beads onto your wire, the spiral will keep them from sliding off the other end.
Step 5: Complete the ring.
Stick the loose end of the wire through the spiral you made on the other end. Then use the round nose pliers to curl the other end of the wire into a spiral as well. You will have two interlocking spirals to hold your ring together.
That's it! It takes less than an hour to make a set of 8, and the materials are pretty inexpensive. A one-ounce coil of memory wire has roughly 100 loops and costs about $4. The beads can be as cheap or as pricey as you want them to be.
I love this project for so many reasons. First, the memory wire is so easy to work with because it holds its shape (which is fabulous when you're trying to make a perfectly round napkin ring). Also, my favorite part of doing beaded crafts is choosing colors and coming up with the design- which is how you spend the majority of your time when making napkin rings. It takes no time at all to put the beads on the ring once you've decided on your pattern. Finally, the interlocking coils makes it super-easy to finish the ring. There's nothing worse than spending hours on a long, intricate beaded necklace just to have all the beads slip off because you're struggling to tie a knot at the end or get a teeny-tiny little crimp bead to behave the way it's supposed to. Wire coils are so much nicer.
112 rings and counting...


No comments:
Post a Comment